

Proudly Serving Austin Since 1988
512-339-0971
Monday -Friday 8:00am-5:00pm
Closed Saturday & Sunday

With approved credit
*** All Products We Stock Are Displayed Assembled & Are Serviced And Tested At The Point Of Sale ***
We reserve the right to change prices without changing the pricing on our website
Austin Outdoor Power Equipment, Inc
.
11104 North Lamar, Unit G, Austin TX 78753 -
512-339-0971
Copyright © 2010 AOPE
all rights reserved.


NOTE: Always disconnect the coil wire from the spark plug first for safety reasons!
AnnualTune-up
Performing a few minor maintenance procedures on your lawn mower can add life to your mower and prevent problems from developing. Doing a yearly tune-up is recommended. This requires changing the spark plug as well as replacing both the air filter and the oil. Check the plug for any signs of wear and change it if necessary. Inspect and tighten every bolt on your lawn mower. Change the oil for all four-cycle engines at the start of each new cutting season. First, run the lawn mower for two minutes to warm the oil. Drain out the old oil. Add the manufacturer's recommended type and quantity of oil. If the air filter is paper, replace it. If it is foam, clean it or replace it if necessary.
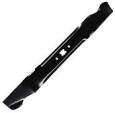
Blade Sharpening
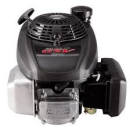
Engine Problems
Suggestion for a Mower That Won't Start
2) Check your fluids to see if they are at appropriate levels. If you recently put oil in your lawn mower and it started to smoke the last time you used it, chances are the oil flooded the engine. This can happen if the lawn mower is tipped over for a long period of time. Top off your oil, start the lawn mower and let it run until all the smoke is gone.
3) Ensure your engine does not have compression lock, which is when air becomes trapped inside the engine. This will prevent the starter clutch from rotating the engine fully, preventing you from getting a full pull on the cord. If this is the case, loosen your spark plug and rotate your engine blade to release the air. Replace the plug and try to start the lawn mower again.
4) Examine the spark plug to see if it needs replacing or is firing incorrectly. If the plug appears to be fouled with dirt on the tip, wipe it off with a rag. If there is too much debris on the tip or it appears burnt, replace the plug.
Vibration Problems
Mowing and Bagging Problems
The deck of a mower is designed to house the cutting blade. The blade is attached to a spindle that turns the blade inside the cutting deck. Grass, dirt and other debris can accumulate on the inside of the deck. If left to accumulate, the operation and function of the blade and mower can be impacted. Cleaning a mower deck and removing debris should be done periodically so that the mower continues to operate as designed.
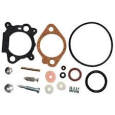
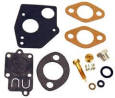
Rebuilding a Lawn Mower Carburetor
1) Remove the air filter from the top of the carburetor. If the filter is corroded, pry it loose with the flathead screwdriver.
2 ) Scrub the area around the filter with the wire brush. Pop the new air filter into place.
3) Oil the choke valve in the area around the screw with the oilcan and refasten the choke valve to the inside of the carburetor using the new swivel screw. Tap the choke valve a few times to make sure it rotates freely.
4) Open the fuel delivery compartment and, using the adjustable wrench, remove the metering rod. Discard the old bolt that was used to attach the metering rod to the mechanical linkage.
5) Clean the metering rod thoroughly using the dry cloth to remove oil and other residue. If necessary, apply some WD-40 or baking soda to loosen the residue.
6) Oil the mechanical linkage that attaches to the top of the metering rod. Make sure that the mechanical linkage moves freely by tapping it a few times.
7) Reattach the top of the metering rod to the mechanical linkage using the new 6-inch steel bolt and the adjustable wrench.
8) Unscrew the float valve using the adjustable wrench. Check the attachment area for corrosion. You may be able to clean the attachment area using the dry cloth, but if there is too much corrosion, the float valve will need to be replaced.
9) Scrub the inside of the fuel nozzle with the wire brush to ensure that the nozzle's pathway to the air intake area is clear. Also scrub the inside of the float chamber using the wire brush. Re-attach the float valve to the inside of the float chamber using the adjustable wrench.


When to Fertilize
Your lawn should be fertilized about three times a year to grow healthy and strong. You’ll want to lay the first layer in the beginning of spring and another layer before the heat of summer sets in. Lastly, before the weather gets chilly you’ll want to lay down one last round of fertilizer. Wait until around the end of September when you notice your grass is slowing down its growth. Follow these easy steps and you’ll be on your way to a lush lawn come spring.
Preparing to Fertilize
Buy the appropriate fertilizer for your lawn - When deciding which fertilizer to use on your lawn, be sure to read the labels. There are three key ingredients in all fertilizers: nitrogen, phosphorus, and potassium. For most lawns you’ll want to use nitrogen based fertilizer. Phosphorus should be saved for newly seeded lawns.
Get the right equipment - You’ll need to have a good quality fertilizer spreader to properly distribute throughout your lawn.
Make sure outdoor conditions are optimal - Be sure it isn’t too windy when you fertilize. It’s also best to spread the fertilizer while there is still light dew on the ground.
Mow - You’ll want to give the grass one final mow before you spread the fertilizer. Be sure in your prep work to leave about 2/3 of the grass blade. Cutting too short will send the grass into shock. Make sure your grass is receptive to the fertilizer so use the correct techniques when mowing.
How to Fertilize Your Lawn
The technique - You want to spread the fertilizer as evenly as possible. Too much overlap or uneven spreading can cause striping and patchiness in the spring. Most rotary spreaders cover a 6-8 foot wide area so don’t start too close to the edge of your lawn.
Start walking before you turn on the rotary spreader and shut it off before you stop walking.
Apply while walking in opposite directions. Be careful to not over fertilize. This will prevent streaks or other damage to your lawn. Be sure to follow the directions on the bag to apply the correct amount of fertilizer. If you regularly leave your clippings on your lawn, you can reduce the amount up to 25 percent as the clippings add nitrogen back in as they decay.
After fertilizing - When finished, water the lawn lightly, taking care to not wash away your hard work. Clean the fertilizer spreader and store for spring.
Austin Outdoor Power Equipment, Inc
.
11104 North Lamar, Unit G, Austin TX 78753 -
512-339-0971
Copyright © 2010 AOPE
all rights reserved. This Web-Site is designed and maintained by Jeff at Austin Outdoor Power
We reserve the right to change prices without changing the pricing on our website

NOTE: Always disconnect the coil wire from the spark plug first for safety reasons!


Don’t mow too short or too frequently. The cooler temperatures and shorter days will slow down the growth of your lawn. Be sure to keep it lush by only cutting only the top third of your grass. Continue to mow regularly but switch up your schedule to once every two or three weeks during the winter.
Monitor your watering closely. Be aware of your
watering schedule
Seed and fertilize. Make seeding a part of your winter maintenance to take care of those patchy areas. Stick to your
fertilization schedule
Be aware of local weather/water conditions and act accordingly. Drought conditions make sustaining a green lawn tough, but there are a few breeds of grass that require less watering, like Zoysia, Bermuda, St. Augustine, Buffalos, Bahia and Fescues. These breeds go dormant rather than dying during dry stretches and do not require food or water. They are great for dry places year-round.
4 Steps for Winter Lawn Care In Warmer States
Thank you
Carve Tools
Honda Mower Rear Wheels Will Not Roll Backwards THE REAL FIX (Carve Tools)